Activities
Getting started with ESP8266
There are many ways to use this wonderfully versatile board, you can use it in its original AT command mode, replace the firmware with the easy to use NodeMCU lua interpreter.
The other way is to go fully custom and write your own firmware for the device, this is easier than it sounds these days as it can be done from the Arduino IDE with all the facilities of its easy to use APIs, and in many cases the 3rd party libraries too.
Software
First, download and install a recent (1.6.x or better) Arduino IDE.
Next we add support for the ESP8266 boards. Go to File->Preferences and enter the following URl into the Additional Boards Manager URLs.
http://arduino.esp8266.com/stable/package_esp8266com_index.json
Now when you go to Tools -> Board -> Board Manager there should be a section labelled esp8266 by ESP8266 Community select and install it.
Your Arduino IDE is now ready to support your ESP8266 board.
Hardware
We now need to connect our ESP8266 module to our computer so that we can program it. There are many different module types with slightly different pinouts, for this tutorial we will assume you have an ESP-01 the cheapest and simplest of the modules, you will also need a USB-UART board such as CP2102 module.
Some modules have selectable 5V or 3V, and some are just 3V safe, so if you have the option select 3V logic mode.
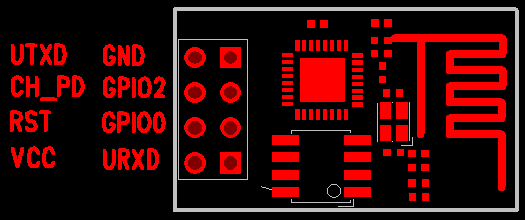
Now connect your USB module to your ESP module as follows:
- 3.3V of UART to Vcc pin of ESP
- Gnd to Gnd
- CH_PD pin to 3.3V (to enable chip)
- GPIO0 to Gnd (to select flash mode)
- RX UART to TX ESP
- TX UART to RX ESP
- RST ESP to Gnd via a button (optional)
The RX and TX lines should be connected directly if possible, not via a breadboard, as the high speeds used are easily corrupted by bad / long connections.
The GPIO0 line controls wether the module is in Run mode (high), or Program mode (low), your devel board may contain a pull-up resistor for normal use.
Now when the board is powered up, or reset, it will come up in flash programming mode.
Your project
In your new project select the following settings:
- Board -> ESP8266 Boards -> Generic ESP8266 Module
- Flashmode: DIO
- Flashspeed: 40MHz
- Upload using: Serial
- CPU Freq: 80Mhz
- Flashsize: 512K
- Upload speed: 115200
You can now write normal Arduino style code, IO pins, SPI, and other features appear just as they did for an arduino board.
For wifi and other features see the Reference page.
After using the Upload' feature from the IDE your device will immediately switch to run mode, you need to reset or powercycle it to get back to flash mode again.